Do you want to make a social media website?
Creating a social media website lets you provide a platform for users to share news, updates, and opinions on various topics. It can build a sense of community among users with shared interests and boost engagement with discussions and forums.
In this article, we will show you how to easily make a social media website in WordPress, step by step.

Before You Start: Create a Social Media Website Checklist
Before starting your social media website, you should first carefully plan the features and concepts that you want your social platform to include.
First, you should choose the type of social media website that you will be creating. For example, you might make a media-sharing website like Instagram or a professional business site like Glassdoor.
You could also create an informational forum site like Quora or a social network site like Facebook.
Once you have come up with an idea, you should go through the following checklist to create a foolproof plan for your website:
- Target Audience: Identify your target audience based on age group, location, and behavior.
- Trends and Preferences: Study user trends for the niche you have selected and try to find features that your target audience will find useful.
- Research Legal Aspects: Ensure your platform complies with data privacy, intellectual property, and other relevant laws. This might mean talking to a lawyer.
- Hire a Developer: Once you have done your research, you could just hire a developer to build a social media website for you. We recommend going with Seahawk Media Services to get an SEO-ready website in no time.
However, if you don’t want to hire a developer, then you can also build a social media website by yourself without any coding required.
Note: This article is about creating a social media website. If you want to embed social media feeds from platforms like Facebook or Instagram on your existing website, then you can use the Smash Balloon plugin. For details, please see our tutorial on how to add your social media feeds to WordPress.
Having said that, let’s take a look at how to easily make a social media website, step by step:
Step 1: Choose a Website Builder
WordPress is the best website builder to make a social media platform because it is super easy to use, scalable, and has powerful features. Plus, it powers over 43% of the sites on the internet.
It is used by many businesses, online stores, and social media websites for news and updates, creating a community, entertainment, and marketing.
However, keep in mind that there are two types of WordPress on the internet.
WordPress.com is a blog hosting platform, while WordPress.org is an open-source, self-hosted software. For more detailed information, you can see our comparison between WordPress.com and WordPress.org.
To create a social media website, we recommend opting for WordPress.org because it is completely free, can integrate with numerous WordPress plugins, and gives you complete control over your website.
For more information, you may like to see our WordPress.org review.
Now that you have chosen a website builder, it’s time to start building your website.
Step 2: Choose a Domain Name and Hosting for Your Social Media Website
To create a WordPress site, you will first need to purchase a domain name and a hosting plan.
A domain name will be your social media platform’s name on the internet. It is what customers will type in their browsers to visit your website, like www.socialmediawebsite.com or www.sociallysavvy.com.
Similarly, web hosting is where your website lives online. To find the perfect web hosting for your social media site, you can see our complete list of the best WordPress hosting services.
You will now notice that even though WordPress is free, this is where your costs will start adding up. A domain name will cost you about $14.99/year while hosting costs start from $7.99/month.
This can be a bit expensive if you have a small budget or are just starting.
Thankfully, Bluehost is offering a HUGE discount to WPBeginner readers along with a free domain name and an SSL certificate. They are one of the largest companies in the world and an official WordPress-recommended hosting partner.
To get a discount, you can just click on the following button:
This will direct you to the Bluehost website, where you must click the ‘Get Started Now’ button.

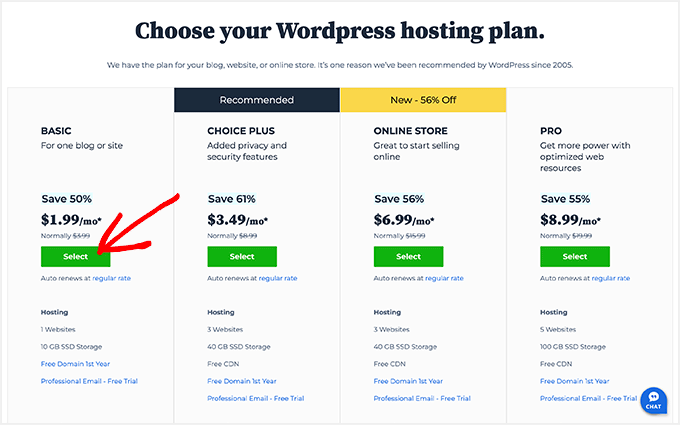
Once you do that, you will be taken to the pricing page, where you must select a hosting plan according to your social media website’s requirements.
We recommend opting for the Basic or Choice Plus plan because they are the most popular web hosting plans among our readers. Upon making a choice, just click the ‘Select’ button under a plan.
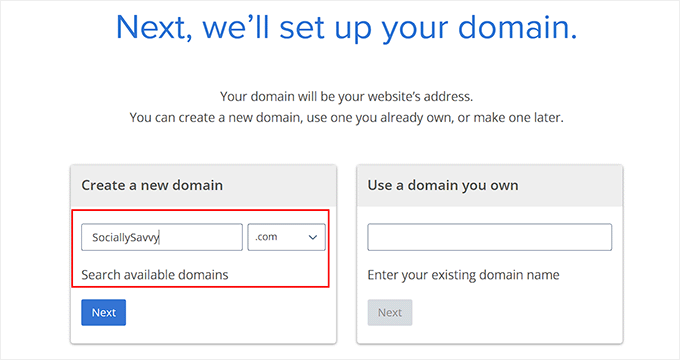
You will now be taken to a new page, where you must choose a domain name for your social media platform.
We recommend selecting a name that is related to your niche and is easy to spell, pronounce, and remember. For ideas, you can see our beginner’s guide on how to choose the best domain name.
However, if you are still confused and do not have a name for your social media platform yet, then you can also try WPBeginner’s Free Business Name Generator to come up with a great name.
After typing in the name, just click on the ‘Next’ button to continue.
This will take you to the next step, where you must provide your account information, phone number, business email address, name, and country.
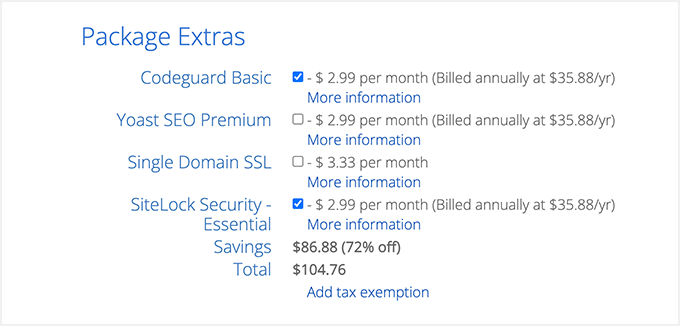
Once you do that, you will also see optional extras that you can buy.
We generally don’t recommend buying these extras straight away, as you can always add them later if your business needs them.
Next, type in your payment information to purchase the hosting plan.
Upon doing that, you will receive a confirmation email with details to log in to your Bluehost dashboard. This will be your control panel where you can easily manage your social media website.
Now, it’s time for you to install WordPress.
Step 3: Create a New WordPress Website
If you signed up on Bluehost using our link above, then WordPress will automatically be installed on your domain name for you.
However, if you want to create a different WordPress site for your social media platform, then you must switch to the ‘Websites’ tab in the Bluehost dashboard.
Once you are there, click the ‘Add Site’ button.
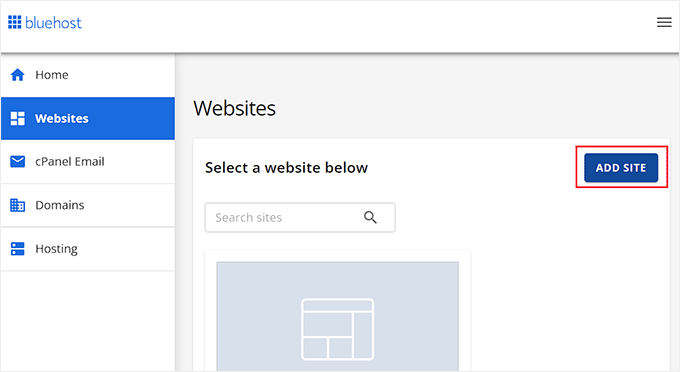
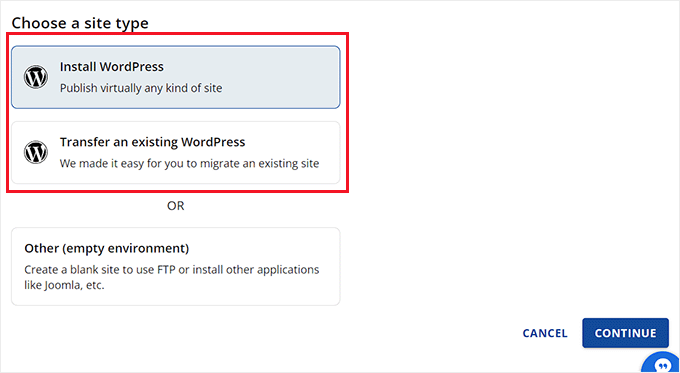
This will take you to a new screen, where you have to select a site type. To create a completely new WordPress site, click the ‘Install WordPress’ option.
On the other hand, to migrate an existing site to a different domain name, you can choose the ‘Transfer an existing WordPress’ option. After that, click the ‘Continue’ button.
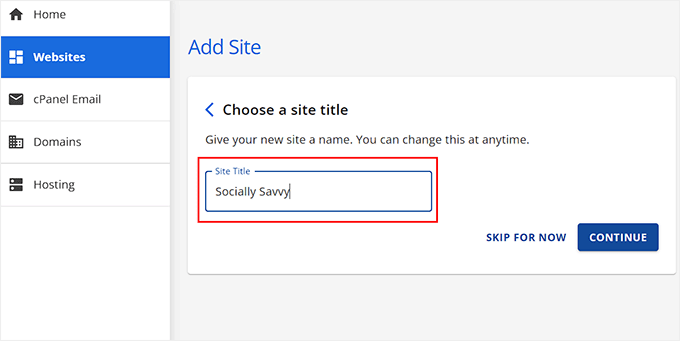
In the next step, you can add a name for your social media website according to your liking.
Then, click ‘Continue’ to move ahead.
Bluehost will now ask you to connect to a domain name for your social media platform.
However, if you haven’t purchased one yet, then you can opt for the ‘Use a temporary domain’ option in the meantime.
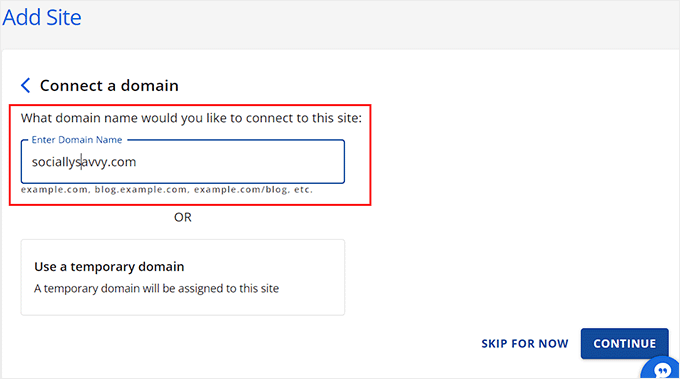
After that, click the ‘Continue’ button. Bluehost will now install and set up your WordPress site for you, which can take a few minutes.
Once that’s finished, you will be redirected to the ‘Websites’ tab, where you will find your newly created WordPress site.
Here, simply click the ‘Edit Site’ button to log in to your WordPress admin area.
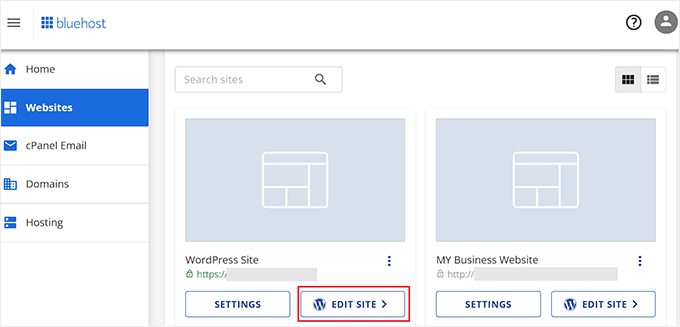
You can also log in to your WordPress dashboard by visiting yoursite.com/wp-admin/ in the web browser. Just make sure to replace yoursite.com with your own domain name.
Step 4: Select a Theme for Your Social Media Website
Once you visit your WordPress website, you will notice that it currently has the default theme activated.
A theme is a professionally designed template that controls how your website looks to your visitors.

To get more visitors to your website and generate leads, it is a good idea to replace the default theme with one that matches your social media website’s niche.
For example, you can install any of the popular WordPress themes and customize them according to your liking.
You can also use themes that are specifically designed for social media websites. For ideas, you can see our list of the best WordPress BuddyPress themes.
BuddyPress is a super popular plugin that is used to make social media networks and websites. In fact, we will show you how to use it later on in this tutorial.
If you need help installing your chosen theme, then you can see our beginner’s guide on how to install a WordPress theme.
Upon activation, visit the Appearance » Customize page from the WordPress admin sidebar to edit the theme according to your liking.
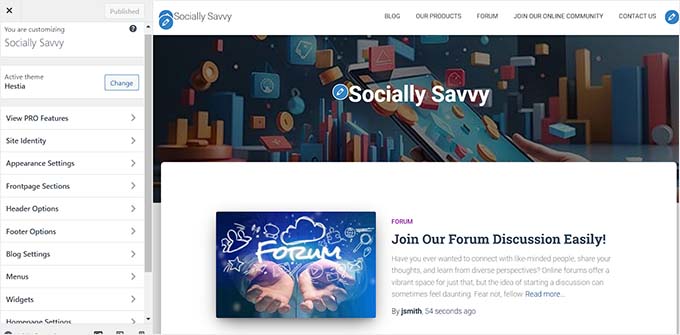
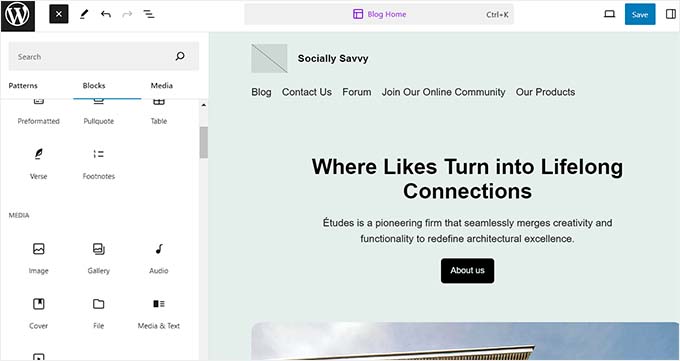
Keep in mind that if you are using a block theme, then you must visit the Appearance » Editor page from the WordPress dashboard to open the full site editor.
Here, you can drag and drop the blocks from the left column to customize your website. Once you are done, don’t forget to click the ‘Save’ button to store your settings.
Step 5: Set Up Your Social Media Website With BuddyPress
By default, WordPress does not have a built-in functionality to create a social media website. That is why we recommend using BuddyPress.
It is a popular and free WordPress plugin that can transform your site into a social network in just a few minutes.
First, you need to install and activate the BuddyPress plugin. For detailed instructions, see our step-by-step guide on how to install a WordPress plugin.
Upon activation, you need to visit the Settings » BuddyPress page from your WordPress dashboard. This will open the components page, which will show all the BuddyPress features that are activated by default.
Here, you can choose the features that you want to add to your social media website. For example, if you want users to be able to follow each other like on Instagram, then you can check the ‘Friend Connections’ option.
You can also choose the ‘Private Messaging’ option to allow users to contact each other privately like on Facebook.
Additionally, you can select the ‘User Groups’ option to allow users to create private or public groups for different activities and discussions.
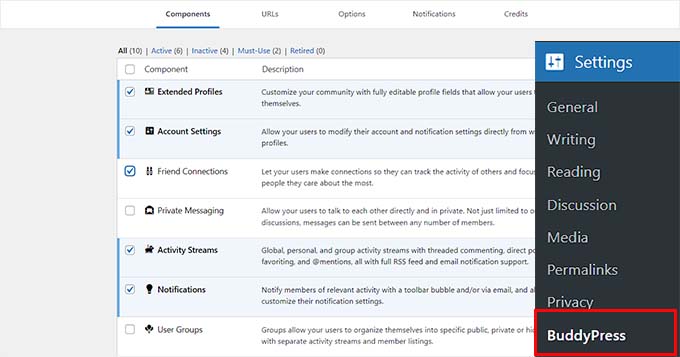
Once you have chosen the components to add to your social media website, don’t forget to click the ‘Save Settings’ button to store your changes.
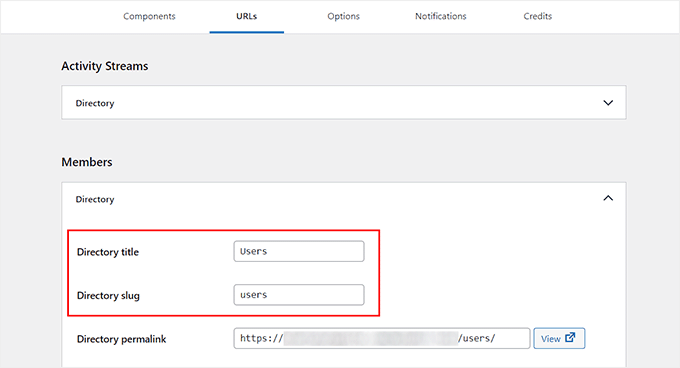
Next, switch to the ‘URLs’ tab. Here, you can configure the slugs and titles for the pages that will be created with BuddyPress.
For example, if you want to call the members of your site ‘users’, then you can add that slug next to the ‘Directory Slug’ option after expanding the ‘Members’ tab.
Keep in mind that you won’t be able to edit the permalinks created by the plugin. Once you are done, click the ‘Save Settings’ button.
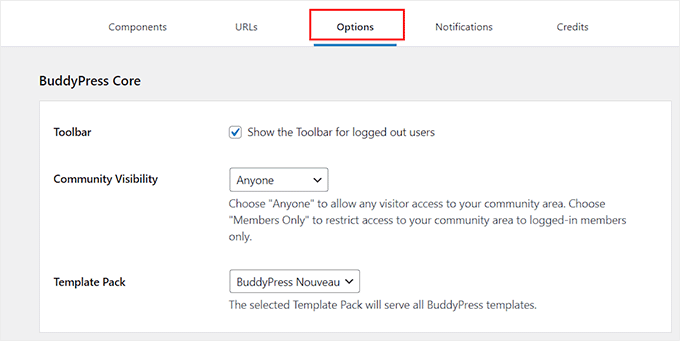
Now switch to the ‘Options’ tab, where you can start by choosing if you want to show the toolbar to logged-in users or not.
After that, you must set your community visibility to ‘Anyone’ if you want any visitor to be able to view the social media activity on your website.
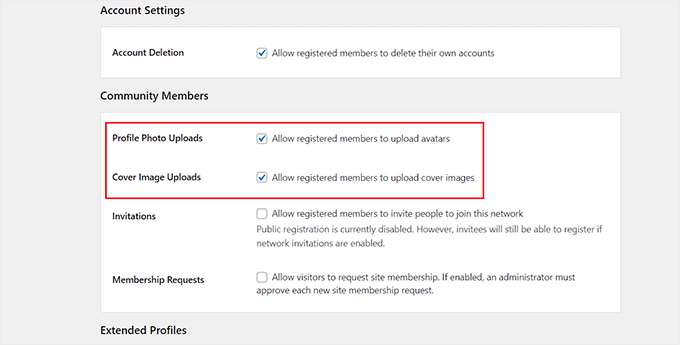
You can then also select if you want to allow users to delete their accounts, upload profile photos, or cover images. You can also allow users to invite other people to join your community.
Then, go ahead and click the ‘Save Settings’ button to store your settings.
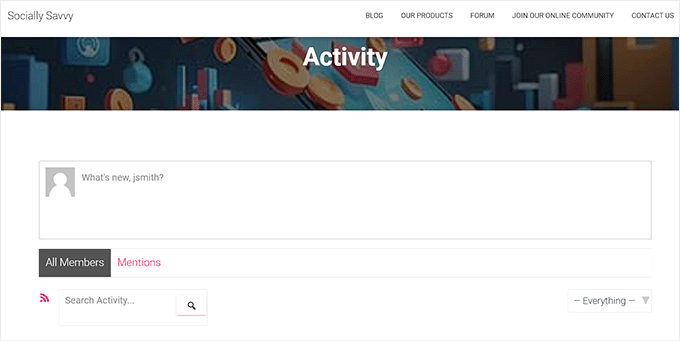
Now BuddyPress will automatically create a Members and Activity Streams page on your website.
This is how the Activity page looked on our demo website.
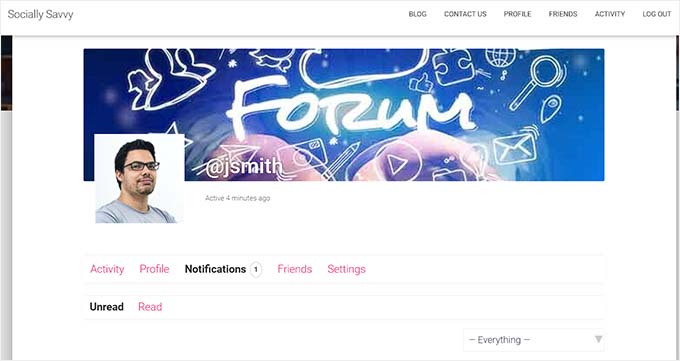
Users will now be able to create their profiles, add cover images, send friend requests, and upload profile photos on your social media website.
Here is a preview of a profile page on our demo website.
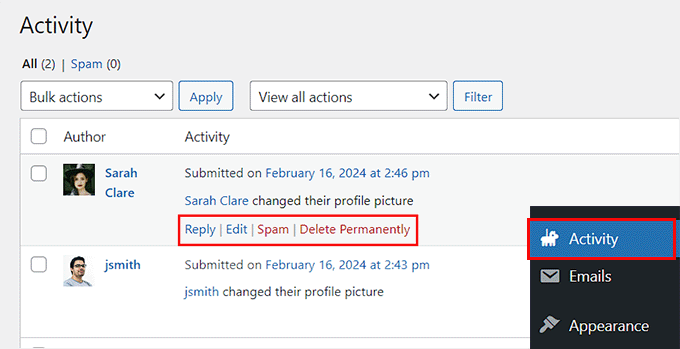
You can also manage different users registering on your site by visiting the Activity menu tab from the WordPress dashboard.
Here, you can keep a log of all the activities being performed by users. You can also edit the action, delete it, or mark it as spam from here.
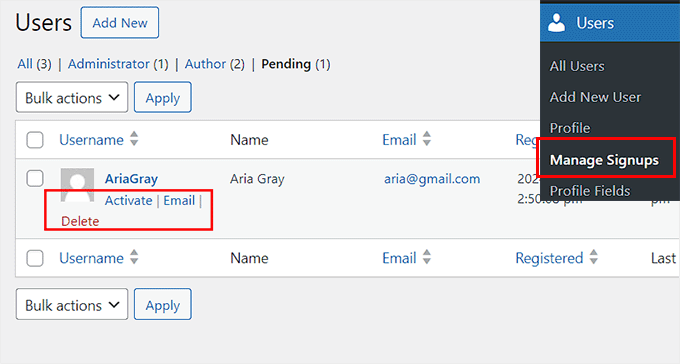
You can manage new signups by visiting the Users » Manage Signups tab from the admin sidebar.
Once you are there, you can activate an account, send an email for verification, or delete it according to your liking.
If you want, you can also add different profile fields for users, add member types, create groups, and manage email notifications right from your WordPress dashboard.
For more detailed instructions on these features, you can see our tutorial on how to turn your WordPress site into a social network.
Step 6: Use bbPress to Create a Forum (Optional)
It is also a good idea to add a forum to your social media website.
This will allow users to start conversation threads and share their thoughts on different topics with each other. This can be great for boosting engagement and motivating other users to sign up on your website.
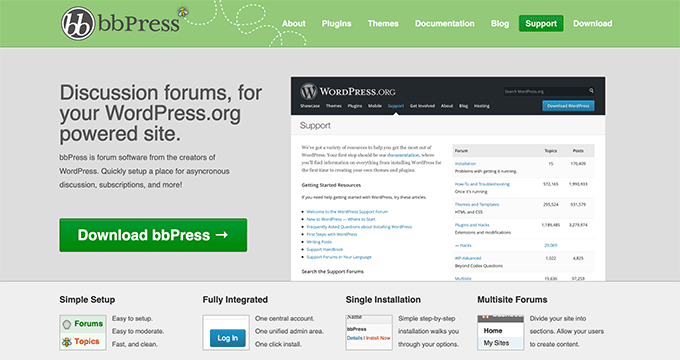
You can easily create a forum with bbPress because it is the best WordPress forum plugin on the market. Plus, the plugin is completely free, making it a great choice.
Upon plugin activation, simply visit the Forums » Add New page from the WordPress dashboard and add a name for the forum that you are creating.
After that, you can add a description and configure the visibility to public, private, or registered users only.
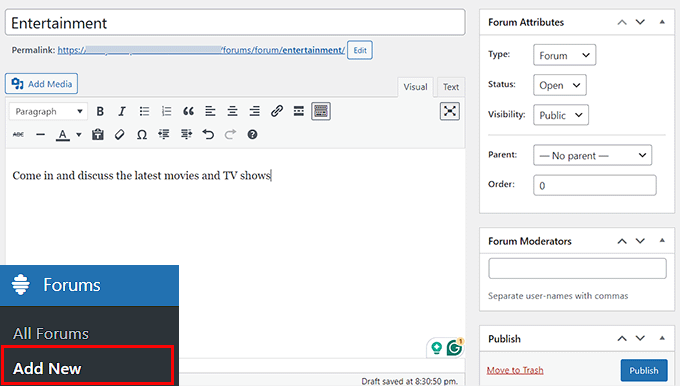
Once you are done, just click the ‘Publish’ button to make your forum live.
With bbPress, you can also moderate the forum, add a ranking system, create categories, and organize different forums as needed.
For detailed instructions, please see our tutorial on how to add a forum in WordPress.
Step 7: Create a Navigation Menu and Homepage
Now that you have set up your social media website and created pages for it, it is important to add these links to the navigation menu. This will allow users to easily find all the pages they need on your site.
To do this, visit the Appearance » Menus page from the WordPress dashboard and expand the ‘BuddyPress Member’ tab in the left column.
From here, check the options for all the pages that you want to add to the navigation menu and click the ‘Add to menu’ button.
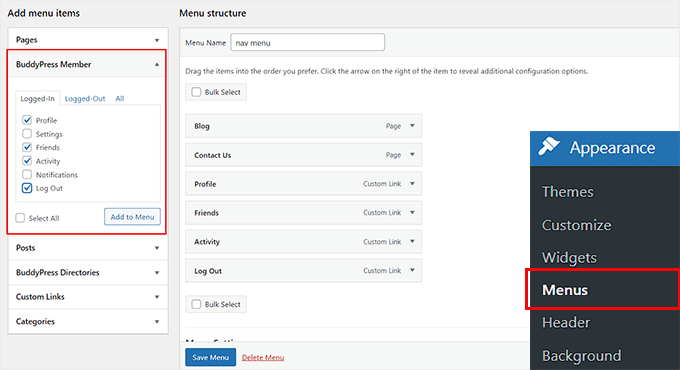
After that, click the ‘Save Menu’ button to store your settings.
If you are using a block theme, then you will have to visit the Appearance » Editor page from the WordPress dashboard instead.
This will open the full site editor, where you must choose the ‘Navigation’ tab.
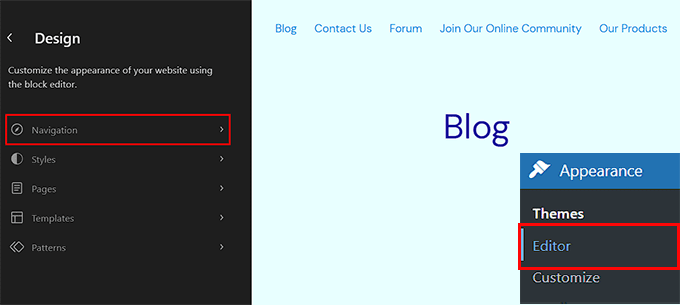
This will open a list of all the navigation menu items in the sidebar on the left.
Here, simply click on the ‘Edit’ button.
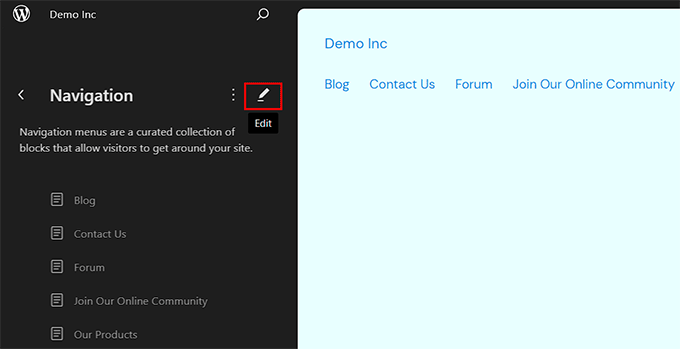
Now, the full site editor will be launched on the screen with the navigation menu settings opened up in the block panel.
From here, click the ‘+’ button and select the ‘Custom Link’ block.
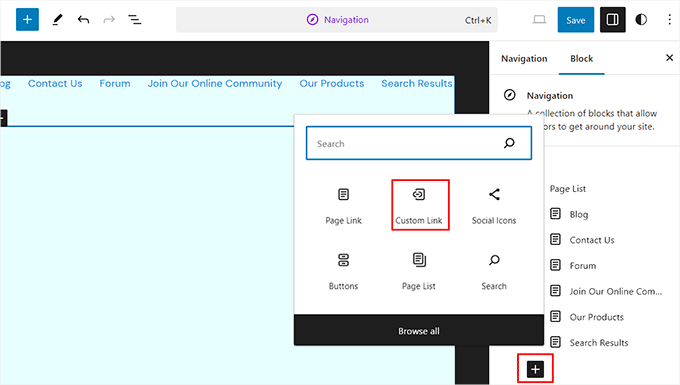
A custom link will now be added to your navigation menu, and a prompt will open up in the block panel on the right.
Here, simply type ‘BuddyPress’ into the search box to view all the pages created by the plugin. You can then choose the one you want to add to your website’s menu.
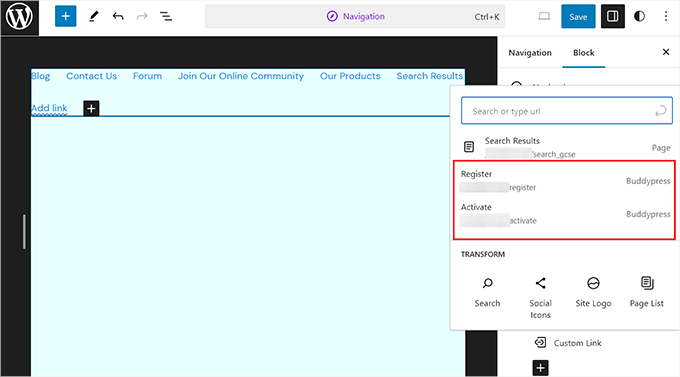
Finally, click the ‘Save’ button at the top to store your settings. For more details, see our tutorial on how to add a navigation menu in WordPress.
Next, you may also want to add an attractive homepage to your social media site. This page will be your site’s introduction to users so you may want to make it visually appealing.
To create an attractive page, you can see our tutorial on how to create a custom home page in WordPress.

Once you have finished designing the page, you can set it as your social media site’s homepage by visiting the Settings » Reading page from your WordPress dashboard.
Here, select the ‘A static page’ option in the ‘Your homepage displays’ section. Next, open the ‘Homepage’ dropdown and choose the page you want to use.
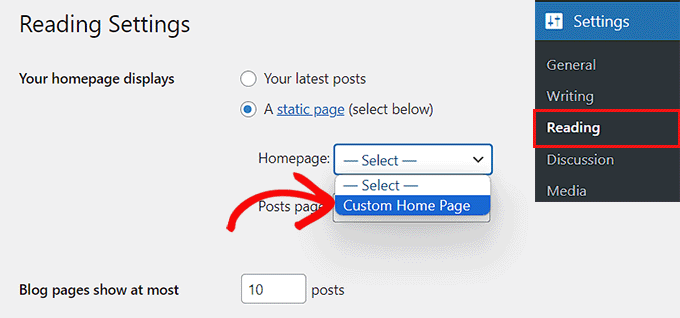
After that, don’t forget to click the ‘Save Changes’ button to store your settings.
Step 8: Use WPForms to Add a Contact Form
Once you have set up your social media website, it is time to add a contact form. This form allows users to contact you if they have any queries and can boost engagement.
To add a contact form, you can use WPForms, which is the best WordPress contact form plugin on the market.
It comes with a drag-and-drop builder, 1400+ premade templates, complete spam protection, and more.
First, you will need to install and activate the WPForms plugin. For details, see our tutorial on how to install a WordPress plugin.
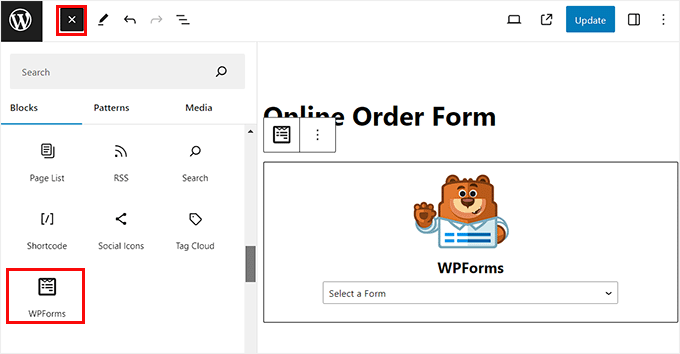
Upon activation, you can use the ‘Simple Contact Form’ template and then add it to any page or post using the WPForms block.
For detailed information, you can check out our tutorial on how to create a contact form in WordPress.
Apart from a contact form, you can also add a business phone service to your social media platform to improve the customer experience.
This way, users can easily reach out to you for time-sensitive issues or if they want to report an inappropriate incident on your platform immediately.
You can easily add a business phone service using Nextiva, which is the best phone service for small businesses. It is easy to use, offers an easy setup, has a lot of features, and has reasonable pricing, making it a great choice.

Additionally, you can also use the platform for online faxing, live chat, online surveys, CRM, call analytics, and more.
For detailed instructions, see our tutorial on how to set up an auto-attendant phone system for your website.
Step 9: Use All in One SEO to Improve Site Rankings
Now that you have created a social media website, it is important to improve its search engine rankings. This can bring more traffic to the platform, increase brand awareness, and ultimately let you grow your social network.
We recommend using All in One Seo for WordPress.
It is the best SEO plugin on the market that comes with an amazing and beginner-friendly setup wizard to help you choose the best SEO settings for your business.

Additionally, it has features like an on-page SEO checklist, XML sitemaps, a broken link checker, a schema generator, and more.
You can also add FAQs and their schema, track individual keyword results, do image SEO, and use the link assistant feature to further optimize your website.
AIOSEO also integrates with other social media networks like Facebook and Twitter and optimizes your content for social media sharing.
For more details, you can see our complete WordPress SEO guide.
Bonus Tools to Improve Your Social Media Site
Here are some bonus tools that you can use on your social media website to boost conversions, get more visitors, and make money from your site:
We hope this article helped you learn how to create a social media website in WordPress. You may also want to see our beginner’s guide on how to create an intranet for small businesses with WordPress and our top picks for the best plugins to convert a WordPress site into a mobile app.
If you liked this article, then please subscribe to our YouTube Channel for WordPress video tutorials. You can also find us on Twitter and Facebook.
