When I first started working on my WordPress websites, I was mostly guessing what visitors wanted. It wasn’t until I started using heatmaps that I truly understood how people interacted with my site — where they clicked, how far they scrolled, and what actually caught their attention.
If you’re trying to improve your WordPress site but aren’t sure what’s working and what’s not, then heatmaps can give you some answers.
After testing several tools over the years, I’ve narrowed it down to 2 easy ways to set up heatmaps in WordPress: Microsoft Clarity and UserFeedback.
In this guide, I’ll go through each setup process step by step. By the end, you’ll have the tools you need to make data-driven changes to your site. 🔥
Why Do You Need to Set Up WordPress Heatmaps?
A heatmap is a visual tool that shows you exactly how visitors interact with your WordPress website. It uses color coding to highlight the most and least active areas on a page:
- Red, orange, and yellow (“hot” areas) show where visitors click, tap, or spend the most time.
- Blue and green (“cold” areas) show spots that get little or no attention.
By seeing this activity mapped out, you can stop guessing about what’s working and what’s not. In other words, heatmaps help remove the guesswork by giving you clear insights into visitor behavior.
They help you answer important questions, such as:
- Are people clicking your CTA buttons?
- Do they scroll down far enough to see your content?
- Are they clicking on things that don’t do anything?
With this information, you can make smart changes to your site. You’ll know what to fix, what to move, and what to improve.
You can use that insight to get more readers, boost sales, or increase inquiries from potential clients — all by making simple changes based on how people actually use your site.
In the following sections, I’ll share how to set up WordPress heatmaps using 2 of the best tools for adding heatmaps. One is completely free, and the other is a premium option with extra features.
Feel free to use the jump links below to go to your preferred method:
Step 0: Preparing Your WordPress Site for Heatmaps
Before you add heatmaps to your WordPress site, it’s important to make sure your site is properly prepared. Taking a few precautionary steps can help prevent any issues as you get started.
If you’re adding heatmaps to your live site for the first time, it’s a smart move to test everything on a staging site first.
A staging site is essentially a duplicate of your live website, where you can make changes and test new features without affecting your real website. It allows you to try out new tools, like heatmaps, safely, without risking any disruptions to the user experience.
Then, you can simply push the changes live to apply them to your real website.
If you use Bluehost, then you can easily create a staging site, thanks to their quick 1-click solution.
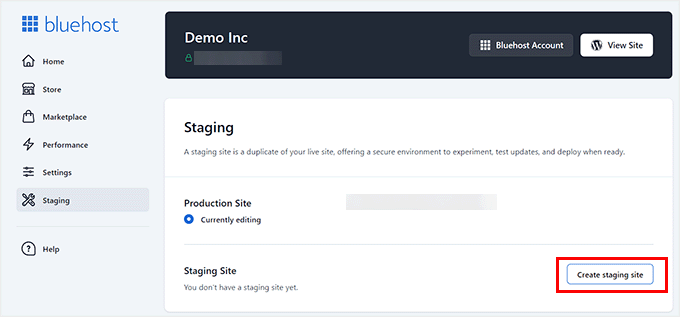
That said, if you don’t have access to staging through your hosting, then you can also use plugins like WP Stagecoach to create staging sites.
For a full walkthrough, you can check out our guide on how to create a staging site for WordPress.
Additionally, always back up your site before making any major changes. Having a backup ensures that, in case something goes wrong during the setup process, you can easily restore your site to its previous state without losing any important data.
Finally, remember that heatmaps work best when used alongside other analytics tools and user feedback.
Think of them as a starting point for uncovering potential issues or opportunities, not the only source of information. Combining insights from heatmaps with broader data gives you a clearer, more accurate picture of how visitors interact with your site.
Method 1: Set Up WordPress Heatmaps Using Microsoft Clarity
Microsoft Clarity is a free, easy-to-use heatmap and session recording tool that integrates seamlessly with WordPress. It’s best for overall site analysis, ideal for beginners, bloggers, and small business owners who want to understand visitor behavior.
That’s why we use it across some of our partner websites to track heatmaps and gain insights into user interactions.
📌 Important: Clarity collects anonymized usage data to improve its services, which can help you comply with the GDPR and other privacy laws. For more details on GDPR compliance, check out our guide to WordPress and GDPR.
Step 1: Create a Free Microsoft Clarity Account
To set up WordPress heatmaps with Microsoft Clarity, you’ll first need an account.
Go to the Microsoft Clarity website and click ‘Get Started.’
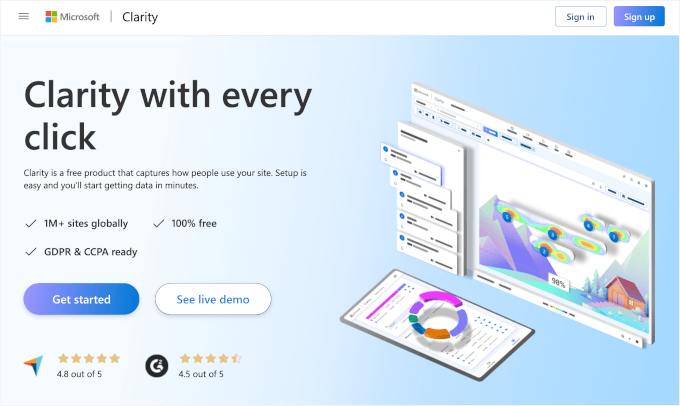
In the popup that appears, you’ll see that you can sign up with a Microsoft, Facebook, or Google account. Just click on the one you prefer.
For this tutorial, I’m going to select ‘Sign in to Google.’

After that, you can follow through the signup process by choosing the appropriate account.
Then, click ‘Continue’ on the confirmation page.

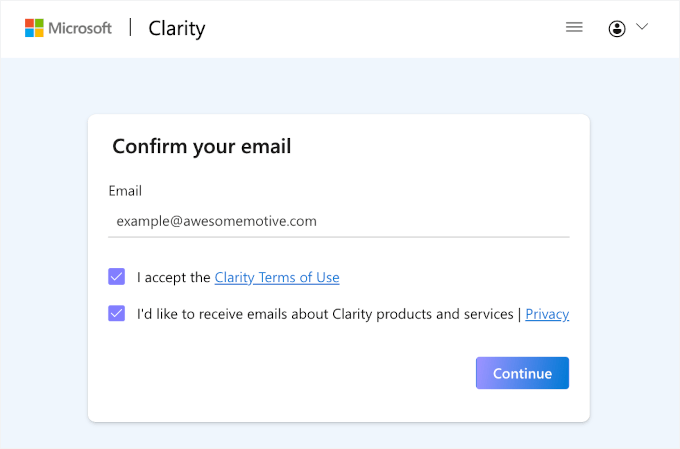
Upon signup, you’ll be asked to confirm your email address.
Don’t forget to check the Clarity Terms of Use and click the checkbox before continuing.
You’ll then be prompted to create a new project for your WordPress site.
You just need to give your project a name, enter your website URL, and choose your industry from the dropdown menu.
With that done, go ahead and click ‘Add new project’ to finish the setup.
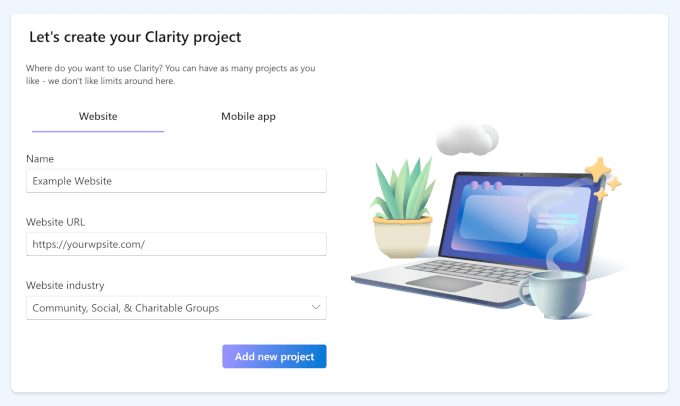
With that done, you’re now ready to install the Microsoft Clarity WordPress plugin to set up heatmaps on your website.
Step 2: Install Microsoft Clarity in Your WordPress Site
In this step, you’ll install the Microsoft Clarity plugin and connect it to the account you just created.
From your WordPress dashboard, let’s go to Plugins » Add New Plugin.
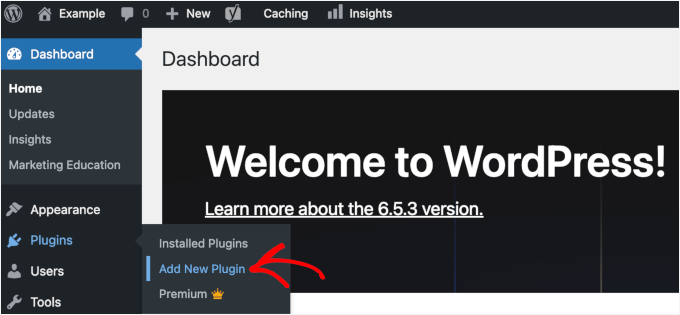
Use the search bar to quickly find the Microsoft Clarity plugin.
Just click ‘Install Now’ on the relevant search result, and once again on ‘Activate’ when it appears.
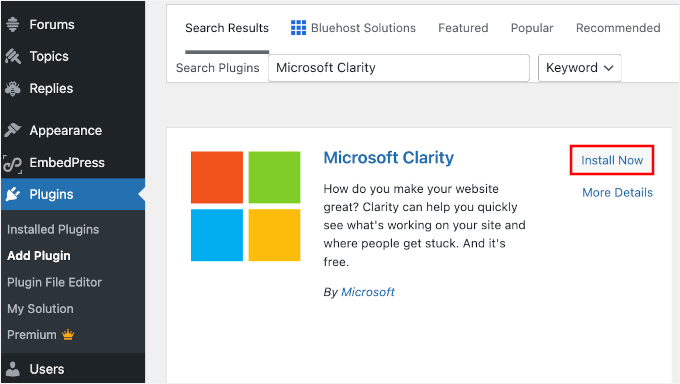
For step-by-step instructions, see our guide on how to install a WordPress plugin.
Upon plugin activation, the next step is choosing a Clarity project to connect both tools.
You can navigate to Clarity from your WordPress admin area and choose the project you just created from the dropdown menu.
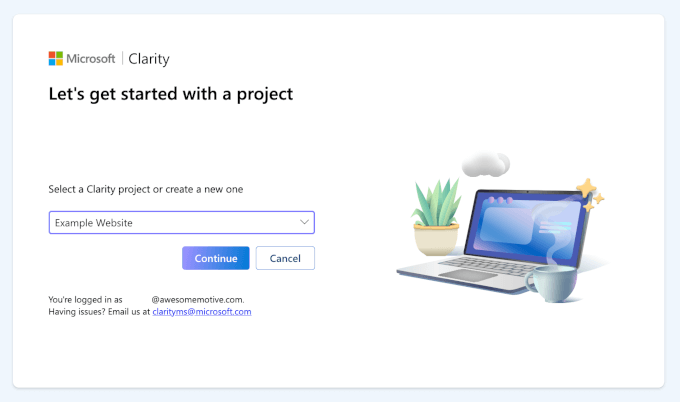
In the next few seconds, you should see a ‘Project integrated successfully’ notification.
For more details, you can see our guide on how to install Microsoft Clarity Analytics in WordPress.
💡 Note: If you are using a WordPress caching plugin, then you need to clear your WordPress cache after connecting Microsoft Clarity to your website. This is important because, otherwise, Microsoft will not be able to verify your site for a few hours.
Step 3: Set Up Heatmaps in Microsoft Clarity
Once you connect Microsoft Clarity, it will automatically start tracking your visitors — no need to paste any code manually or mess with theme files.
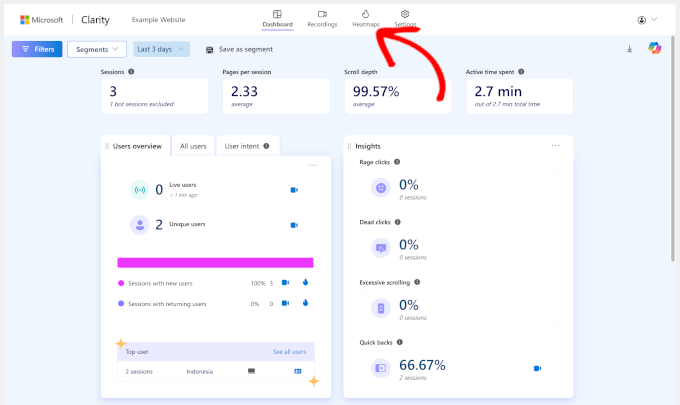
Inside your Clarity dashboard, you’ll find useful reports that give you an overview of how people interact with your WordPress blog or site.
Some of the key metrics include:
- Sessions – This shows how many individual visits your site received.
- Pages per session – Tells you how many pages a visitor viewed during one session.
- Scroll depth – Shows how far users scroll down each page.
- Active time – Tracks how long users are actively engaging with your page (not just leaving it open in a background tab).
You’ll also find pre-built widgets like the ‘User Overview,’ which highlights visitor types and devices.
Plus, there are behavioral insights such as rage clicks (when users repeatedly click in frustration) and excessive scrolling (when users scroll too much, possibly looking for something).
To see your heatmaps, go ahead and switch to the ‘Heatmaps’ tab.
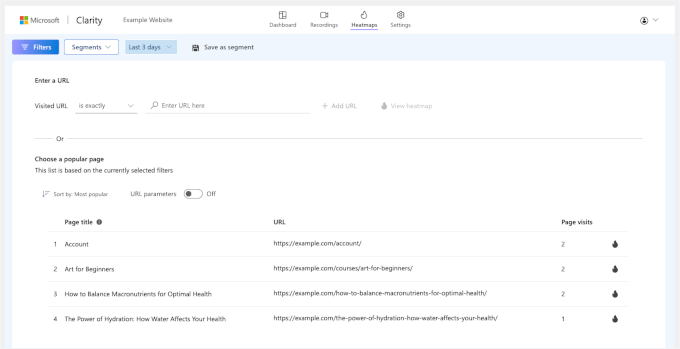
Once inside, you’ll see a list of all the page heatmaps that Clarity automatically recorded.
Just click on a page you want to analyze.
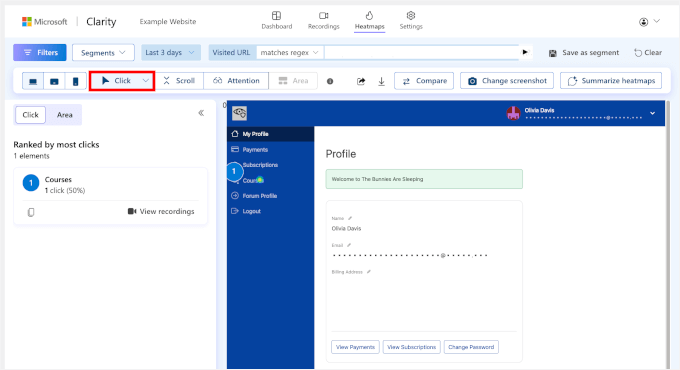
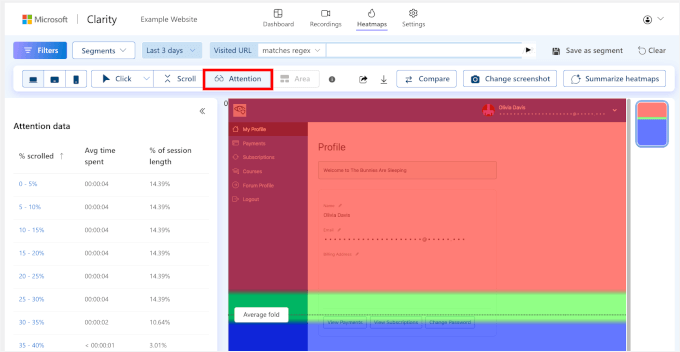
Once you open a heatmap, you’ll see three main views: Clicks, Scroll, and Attention.
You can switch to ‘Click’ to see where visitors are clicking the most.
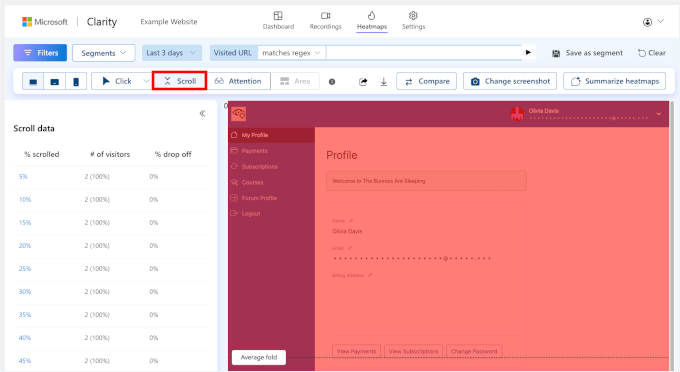
To find out your scroll depth, simply move to the ‘Scroll’ tab.
Here, Clarity will reveal how far users scroll down your page. This helps identify if they miss your key content.
Finally, go ahead and click on the ‘Attention‘ button to see the average time visitors spend on different parts of the page.
Red zones indicate higher attention, while blue areas get less.
That’s all – You’ve successfully set up WordPress heatmaps using Microsoft Clarity!
Method 2: Set Up WordPress Heatmaps Using UserFeedback
UserFeedback by MonsterInsights combines heatmap-style feedback with surveys and advanced targeting. It’s a powerful option for growing websites, online stores, and agencies needing deeper insights and more control over how to collect visitor feedback.
At WPBeginner, we have used UserFeedback to gain insights into what our web design customers want and expect from us. We’ve had a great experience with it, and you can check out our full UserFeedback review to see why we recommend it!
Step 1: Install and Activate UserFeedback
First, you’ll need to set up a UserFeedback account. You can do this by visiting the UserFeedback website and signing up for a plan.
💡 Note: There is a free version of UserFeedback if you want to explore its features. But you will need at least the Elite plan to unlock UserFeedback’s Heatmaps feature.
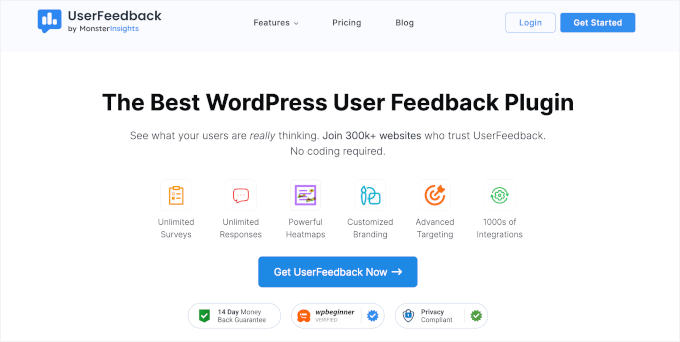
Once you’ve signed up for an account, you’ll be redirected to your UserFeedback account dashboard, where you can find the download link to the UserFeedback zip file and your license key.
Now, it’s time to install the plugin.
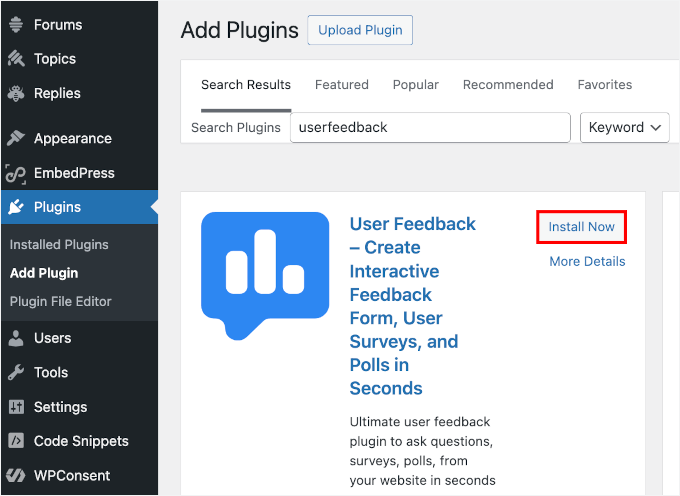
From your WordPress dashboard, you need to go to Plugins » Add New.

On the next screen, let’s search for UserFeedback.
You can then install and activate the plugin like you would any other WordPress plugin.
New to installing plugins? Here’s a detailed guide on how to install a WordPress plugin.
Once activated, you can enter your license key to unlock all the pro features that come with your plan.
To do this, you can navigate to UserFeedback » Settings. Then, simply copy and paste your license key from your UserFeedback dashboard into the ‘License Key’ field.
Go ahead and click the ‘Verify’ button to start the verification process.
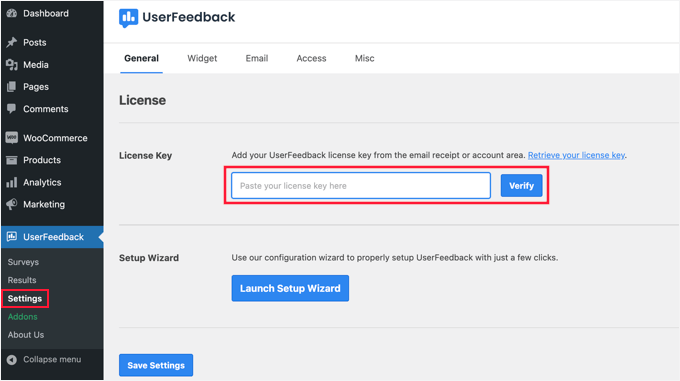
In a few seconds, you should see a verification success message.
Step 2: Enable the Heatmaps Addon
Now, let’s go to UserFeedback » Addons to install the Heatmaps addon.
You can just scroll down the page to find the Heatmaps addon and click ‘Install Addon’ in the appropriate box.
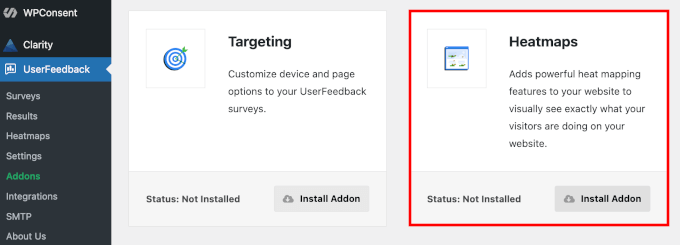
Once installed, make sure it’s activated by clicking the ‘Activate’ button.
Step 3: Create a New Heatmap
With the Heatmaps addon activated, you can now create your site’s heatmap.
Let’s go to UserFeedback » Heatmaps in your WordPress dashboard, and click the ‘New Heatmap’ button.
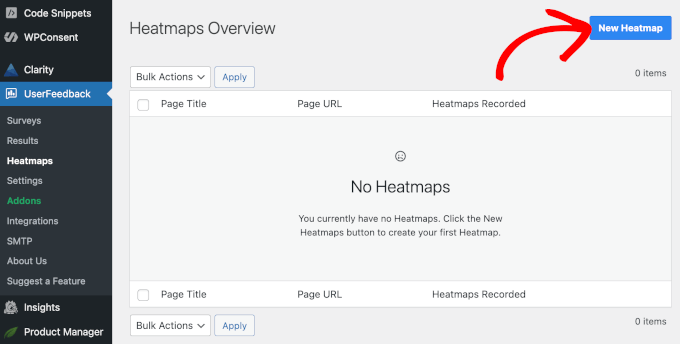
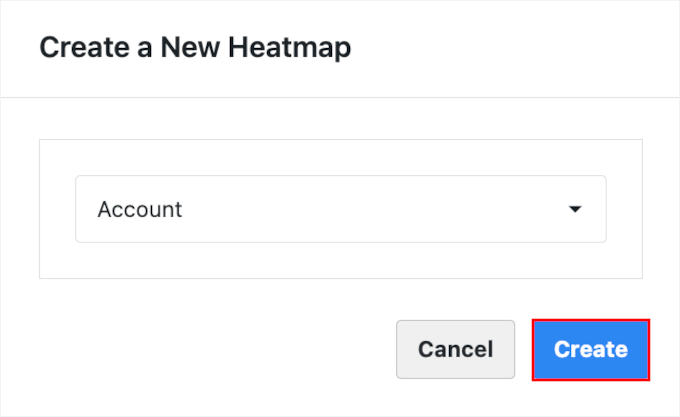
In the popup that appears, expand the dropdown menu to select the specific page you want to track. For example, you can create a heatmap for your homepage, landing page, or blog post.
Go ahead and hit the ‘Create’ button to set up the heatmap.
Step 4: View Your Heatmap Results
After you create a heatmap, UserFeedback will start collecting user data immediately.
Let’s go to UserFeedback » Heatmaps and click on a heatmap to see detailed visual insights.
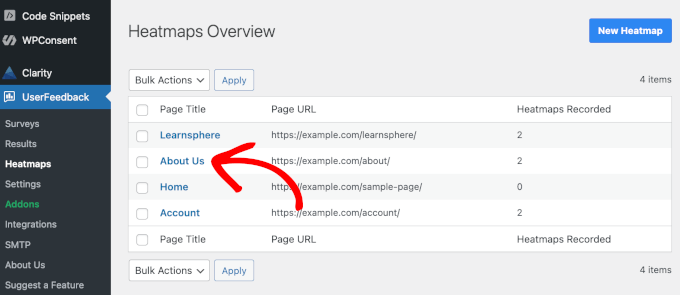
On the next screen, you’ll be able to view detailed insights about your visitors, including:
- Device Filter – Compare user behavior across desktop, tablet, and mobile.
- Clicks – See exactly where people are clicking on your page.
- Mouse Movements – Track how users move their mouse across the screen.
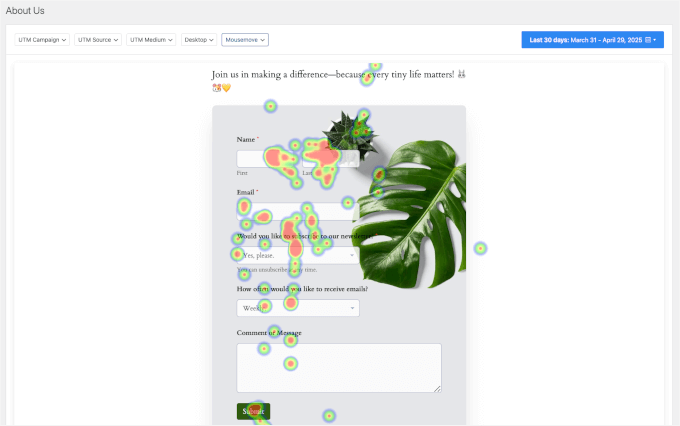
If you’re promoting your site across multiple channels, then you can also filter the data by UTM campaign, source, or medium. This helps you understand how visitors from different marketing efforts interact with your site.
And that’s all there is to it – You’ve successfully set up WordPress heatmaps using UserFeedback!
Bonus Steps: Maximize Your Heatmap Insights 🔥
Heatmaps are only useful if you know how to act on what they’re telling you. Here’s how to turn the insights from your heatmaps into real improvements for your WordPress site.
Fix Where Visitors Drop Off
You can use scroll maps to see how far down your visitors go on a page. If important content is buried too far down the page, then most people may never see it.
You can try moving key elements like CTAs or offers higher on the page, and break up long pages with smaller sections and clear headings. You can also use date filters to track how these changes affect visitor behavior over time.
This small change can reduce bounce rates and keep your visitors engaged longer.
Spot and Solve User Confusion
Sometimes, visitors try to click on images, icons, or text that aren’t clickable. This shows that they’re confused or expecting something different.
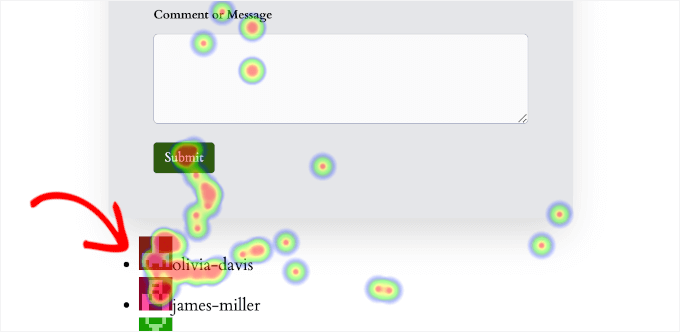
You can review your click maps and mouse movements to spot these areas. If necessary, you can link those images or add buttons nearby to make things easier for users.
You can also set up a quick survey with UserFeedback to ask what users were expecting to find.
Identify and Fix Navigation Issues
If you see visitors frequently jumping between pages without clear direction, it’s a sign that your navigation may be confusing.
Simplify your navigation by making sure information is easy to find and adjusting anything that could cause confusion. You can also walk through important steps on your site like a first-time visitor to ensure everything functions properly.
You may also want to see our guide on how to create a custom navigation menu in WordPress.
Make Your CTA Buttons Impossible to Miss
If your CTAs (call-to-action buttons) aren’t getting enough clicks, then I recommend adjusting their color, text, or placement to make them stand out more.
Go ahead and use your mouse movement insights to spot hesitation before clicking and check device filters to ensure your CTAs are visible and easy to click on all devices, especially mobile.
🧑💻 Pro Tip: Making changes to your content and design is just the start. I also highly recommend setting up A/B tests to compare different versions of a page or element, like button placement, colors, or headline text, to see what performs best.
For detailed instructions, please refer to our guide on how to do A/B split testing in WordPress.
I hope this article has helped you set up WordPress heatmaps. Next, you might want to explore our expert-curated landing page tips to skyrocket WordPress conversions and our ultimate guide on geolocation targeting.
If you liked this article, then please subscribe to our YouTube Channel for WordPress video tutorials. You can also find us on Twitter and Facebook.
