Recently, one of our readers asked us how they can pass payment processing fees to customers in WordPress.
Most payment processors charge additional fees to facilitate a secure transaction process for the buyer and seller. Asking customers to pay the payment processing fees helps you increase your earning by around 3%.
In this article, we will show you how to easily pass payment processing fees to customers in WordPress, step by step.
Why Pass Payment Processing Fees to Customers in WordPress?
If you have an online store, then you may have noticed that most payment processors charge you additional per-transaction fees, percentage-based fees, and gateway fees.
For instance, if a user buys a chair from your furniture store for $50 and uses Stripe as a payment method, then you will only get $48.55 in your account. This is because Stripe collects 2.9% + $0.30 per transaction.
Passing this processing fee to customers allows you to receive the entire amount ($50) for your product/service without having to worry about absorbing this fee as a business expense.
Plus, it gives you more control over your product pricing strategy.
It also helps build transparency with customers by adding a separate line for the fees on the checkout page, which can act as a competitive advantage. It will allow you to set lower base prices for your products and attract more customers who are looking for the lowest total cost.
Having said that, let’s see how to easily pass the payment processing fees to customers in WordPress. In this tutorial, we will cover three methods, and you can use the links below to jump to the one of your choice:
Method 1: Pass Payment Processing Fees to Customers With WP Simple Pay
WP Simple Pay is the best WordPress Stripe plugin on the market that allows you to accept payments from customers without adding a shopping cart. It comes with premade templates, has a form builder, and lets you add payment processing fees directly to the customer’s bill.
Plus, WP Simple Pay is a great choice if you have a membership site, sell courses online, or sell a single product in your online store.
First, you will need to install and activate the WP Simple Pay plugin. For detailed instructions, see our step-by-step guide on how to install a WordPress plugin.
Note: WP Simple Pay has a free plan. However, you will need to upgrade to the pro version to unlock the fee recovery feature.
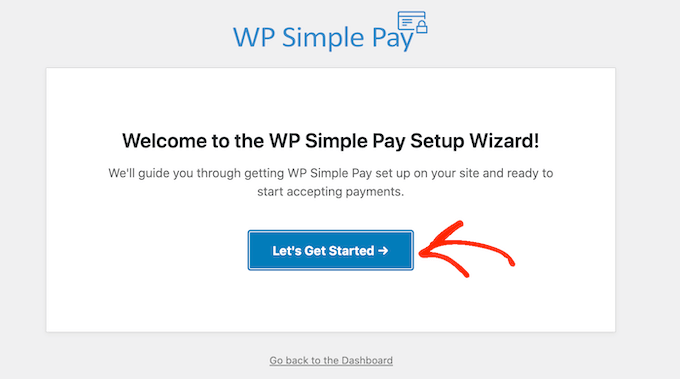
Upon activation, a setup wizard will open up on your screen. Here, you must click the ‘Let’s Get Started’ button.
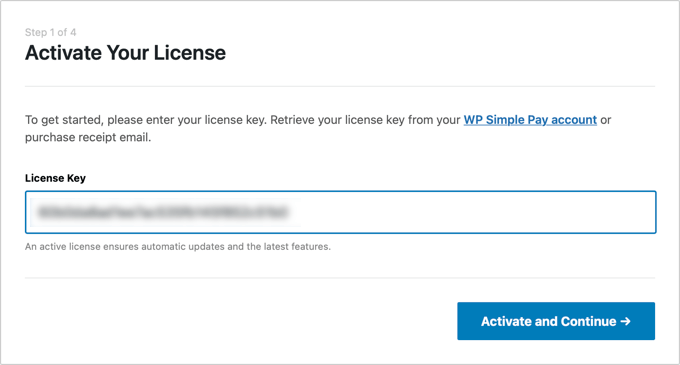
This will take you to the first step, where you have to add your plugin’s license key and click the ‘Activate and Continue’ button.
You will get this information from your account on the WP Simple Pay website.
After that, you will need to connect your Stripe account with WordPress.
Go ahead and click the ‘Connect with Stripe’ button to continue.
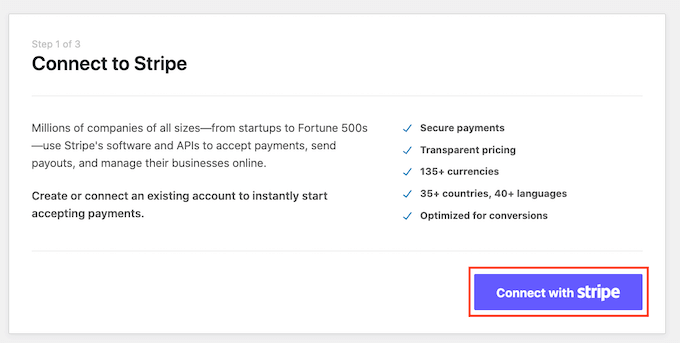
Once you do that, you must log in to your Stripe account to connect it with WP Simple Pay and then configure the other setup wizard steps.
For detailed instructions, you can see our tutorial on how to create WordPress forms with payment options.
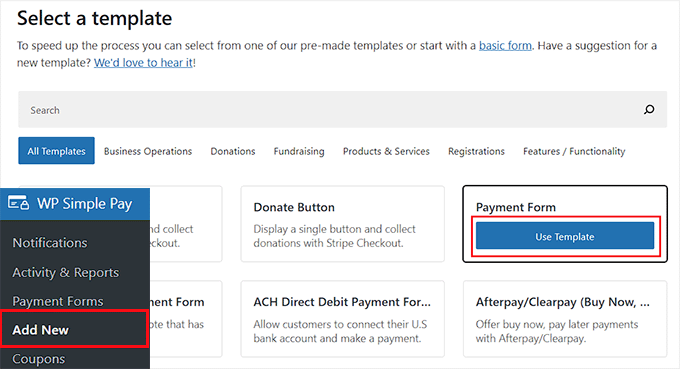
Now, you can start by visiting the WP Simple Pay » Add New page from the WordPress admin sidebar. This will direct you to the ‘Select a Template’ page where you can choose any template you like.
For this tutorial, we will be creating a simple payment form.
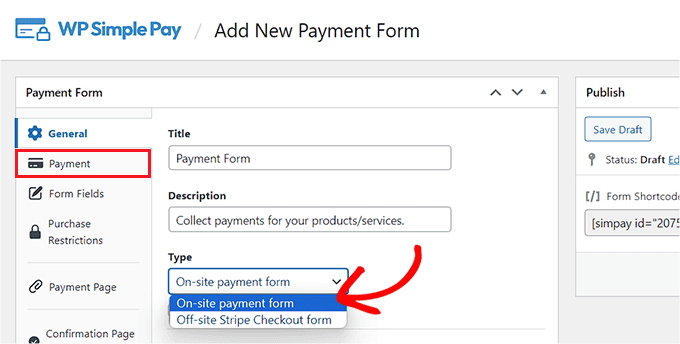
The form builder will now open up on your screen. Here, you have to provide a name and description for the form that you are about to create.
Then, select ‘On-site payment form’ as the form type and switch to the ‘Payment’ tab.
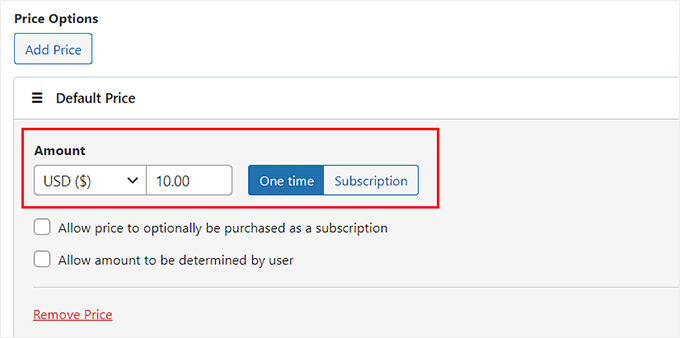
Once you are there, scroll down to the ‘Price Options’ section and simply add an amount for your product or service. You can also pick if you want it to be a one-time or recurring payment.
If you want to add multiple prices, then you can click the ‘Add Price’ button at the top.
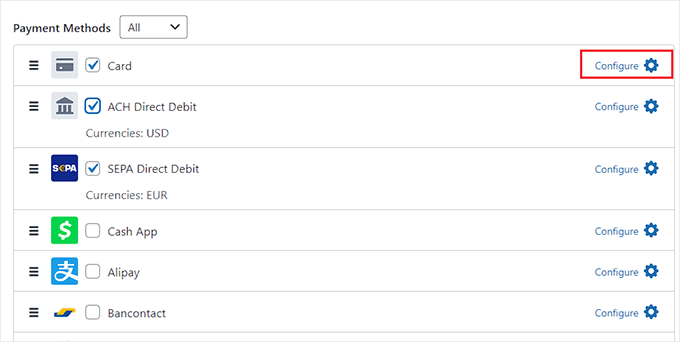
After that, scroll down to the ‘Payment Method’ section and check the boxes next to the gateways that you want to add to your payment form.
With WP Simple Pay, you can add KIarna, Affirm, AliPay, debit card, credit card, SEPA Debit, and many more methods.
Once you do that, click the ‘Configure’ link next to the payment option of your choice.
This will open a prompt on the screen, where you have to check the ‘Add an additional fee to payments made with this payment method’ option. Once you do that, you can set a transaction fee percentage for the product that you are selling.
If you don’t configure this setting, then Stripe will automatically add 2.9% of the product price as the fee. Then, click the ‘Update’ button to store your settings.
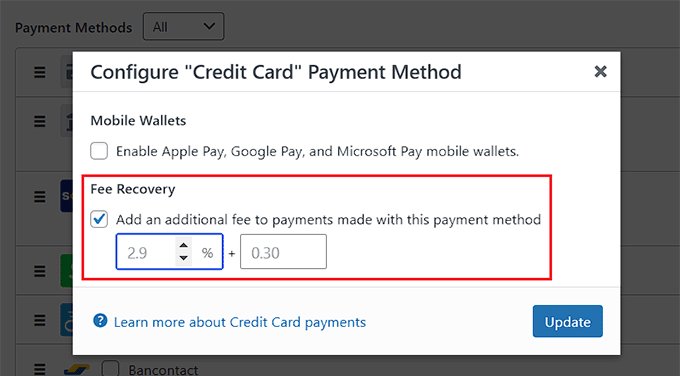
Now, the payment processing fee will automatically be added to the customer’s bill on the checkout page.
However, if you think that adding a recovery fee without customer consent can damage your reputation, then you can also provide a choice to your customer.
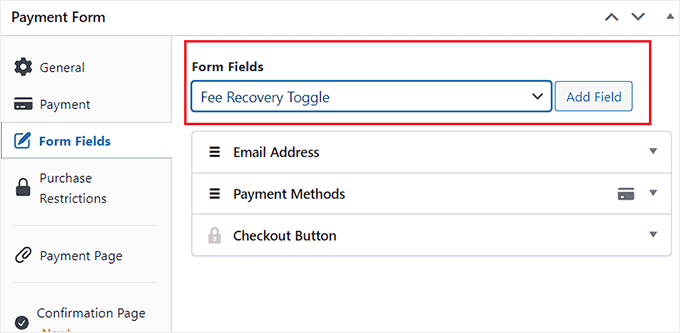
To do this, switch to the ‘Form Fields’ tab. Here, you can add, rearrange, or delete fields in the form according to your liking. For more information, you can see our tutorial on how to accept payments with Stripe in WordPress.
Once you do that, open the ‘Form Fields’ dropdown menu and select the ‘Fee Recovery Toggle’ option. Then, click the ‘Add’ button.
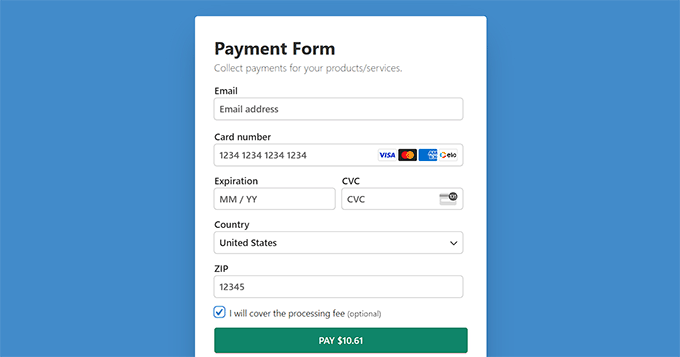
Now, users on your site will have to toggle this switch if they want to pay the payment processing fee themselves.
Next, switch to the ‘Payment Page’ tab and check the ‘Enable a dedicated payment page’ option.
After that, you can now customize your payment form page by adding a permalink, color scheme, image, and footer text.
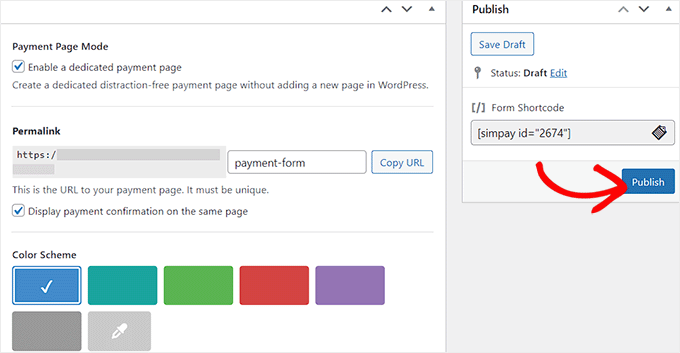
Once you are done, don’t forget to click the ‘Publish’ button at the top.
Now, simply visit your payment form page to view the fee recovery feature in action.
Method 2: Pass Payment Processing Fees to Customers With Easy Digital Downloads
If you sell digital products like eBooks, PDFs, music, or spreadsheets, then this method is for you.
Easy Digital Downloads is the best WordPress plugin for selling digital products that makes it super easy to pass processing fees to customers using an addon.
First, you will need to install and activate the Easy Digital Downloads plugin. For detailed instructions, see our beginner’s guide on how to install a WordPress plugin.
Note: EDD has a free plan. However, you need the pro version to unlock the ‘Gateway Fees’ extension.
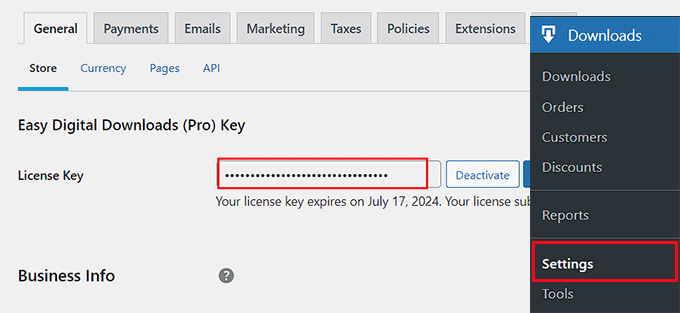
Upon activation, head over to the Downloads » Settings page from the WordPress dashboard to enter your license key.
You can get this information from your account on the Easy Digital Downloads website.
After that, you must set up your store to start selling products. For detailed instructions, you can check out our beginner’s guide on how to sell digital downloads in WordPress.
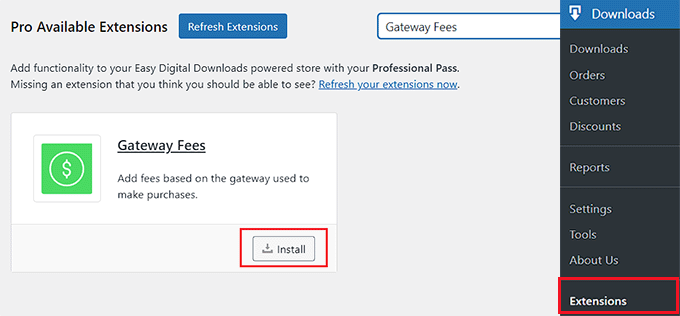
Once you have done that, visit the Downloads » Extensions page from the WordPress admin sidebar and locate the ‘Gateway Fees’ extension.
Then, click the ‘Install’ button under it.
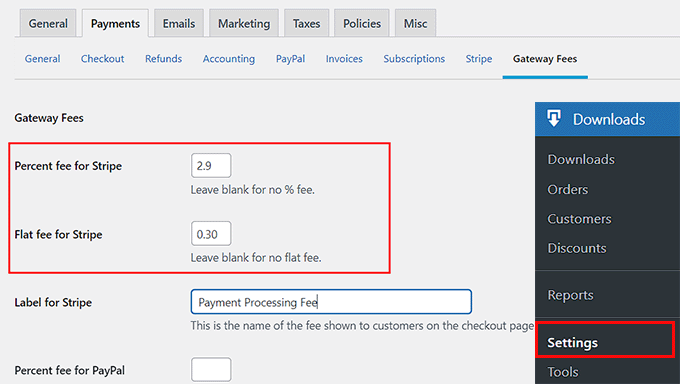
Upon addon activation, visit the Downloads » Settings » Payments page and switch to the ‘Gateway Fees’ tab.
Here, you can add the payment processing fee that you want to charge your customers next to the ‘Percent fee for Stripe’ or ‘Flat fee for Stripe’ options.
Once you do that, you can add a label that will be displayed on the checkout page to explain the additional fee being charged to the user.
You can configure the gateway for all the payment methods that you have added to your site from this page.
After that, don’t forget to click the ‘Save Changes’ button to store your settings.
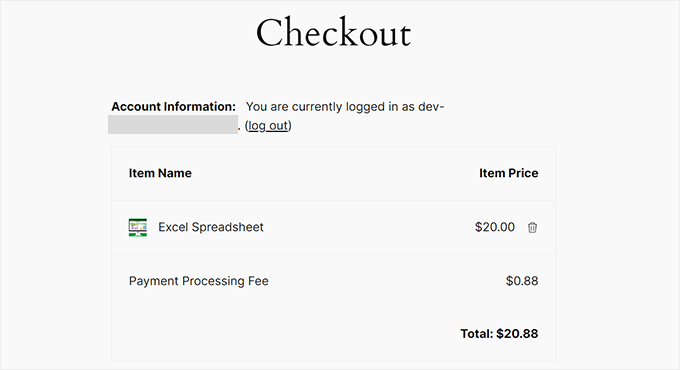
You can now visit your WordPress site to view the additional payment processing fee on the checkout page.
Method 3: Pass Payment Processing Fees to Customers With WP Charitable
If you accept donations or do crowdfunding through your website, then this method is for you.
WP Charitable is a popular WordPress donation plugin that lets you create unlimited fundraising campaigns and comes with a Fee Relief extension to allow users to cover payment processing fees.
For this tutorial, you will need the WP Charitable Plus license to unlock this extension.
First, you will need to install and activate the core Charitable plugin, which is completely free. For detailed instructions, you can see our tutorial on how to install a WordPress plugin.
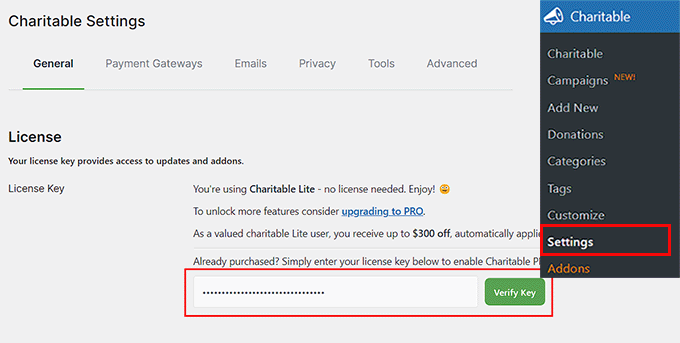
Next, visit the Charitable » Settings page from the WordPress dashboard to enter your pro plan’s license key and click the ‘Verify Key’ button.
You can find this information in your account on the WP Charitable website.
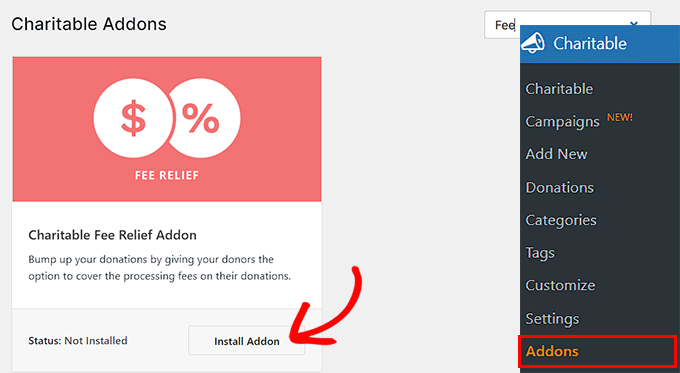
After that, head over to the Charitable » Addons page from the WordPress admin sidebar and find the ‘Charitable Fee Relief’ extension.
Then, click the ‘Install Addon’ button.
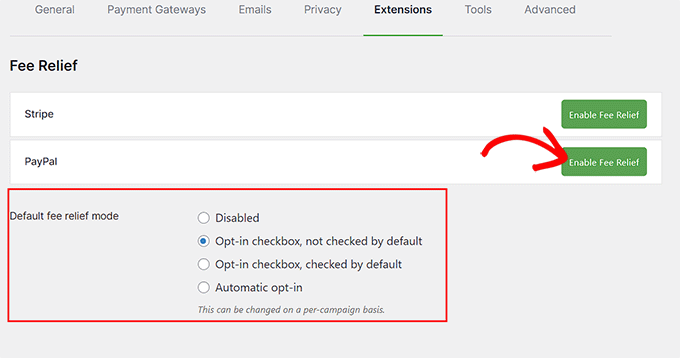
Upon addon activation, you need to go to the Charitable » Settings page and switch to the ‘Extensions’ tab.
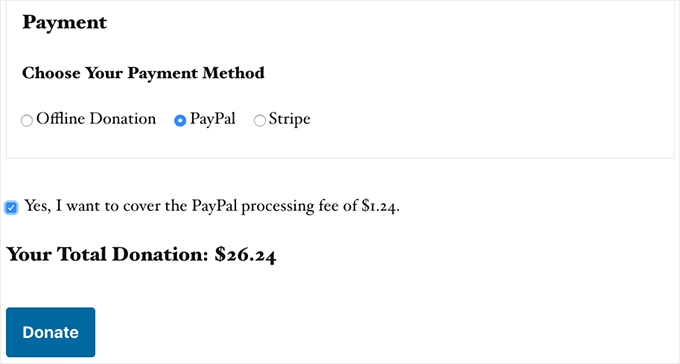
Here, you can check the ‘Opt-in checkbox, checked by default’ option as a fee relief mode. This will add a checked box to the donation form for fee recovery. If the user does not want to pay the processing fee, then they will have to uncheck this box.
However, if you don’t want to provide users with an option and automatically add the recovery fee along with the donation amount, then you can check the ‘Automatic opt-in’ option.
After that, you must click the ‘Enable Fee Relief’ button next to the payment gateways to activate fee recovery for payment processing.
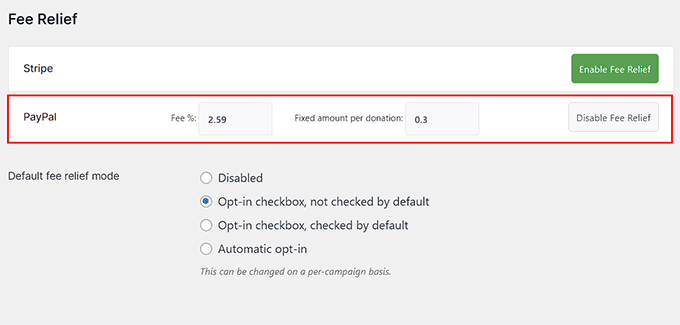
Once you do that, you can set a payment processing fee as a combination of a percentage and a fixed amount per donation.
For instance, if PayPal charges 2.9% and $0.30 per transaction, then these are the amounts that you will have to add in the fields.
Once you are done, don’t forget to click the ‘Save Changes’ button to store your settings.
Now, you must start building your website’s fundraising campaign. To do this, visit the Charitable » Add New page from the WordPress dashboard.
Here, you will have to enter a campaign name, after which you will be taken to the ‘Select a Template’ page.
From here, click the ‘Create Campaign’ button under a template of your choice.
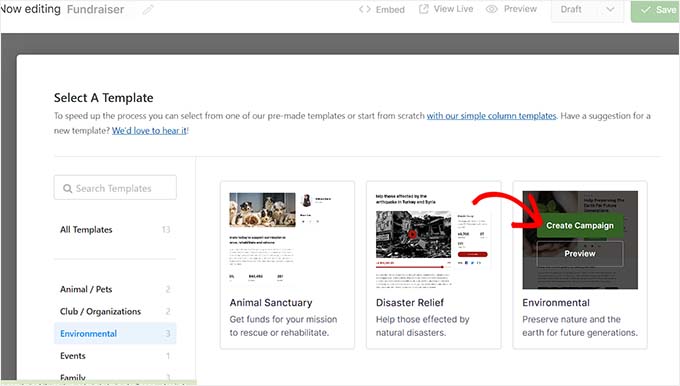
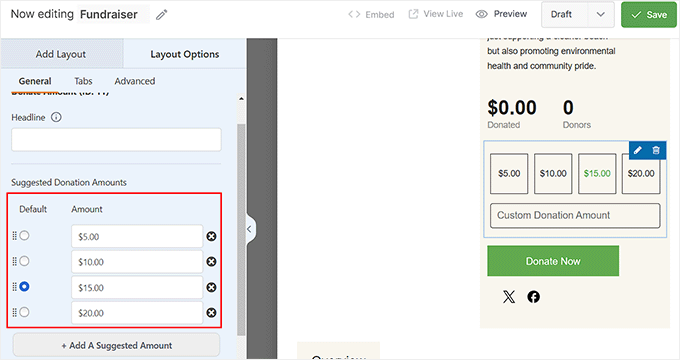
This will open the drag-and-drop builder, where you can drag, rearrange, and delete form fields according to your liking.
For example, you can add the ‘Donation Amount’ field and then add some custom amounts that users can choose from in the left column.
Once you do that, you can also add a progress bar, social links, a campaign title, and more from the left sidebar. You can also configure payment gateways by switching to the ‘Payment’ tab.
For more information, you can see our tutorial on how to raise money with crowdfunding in WordPress.
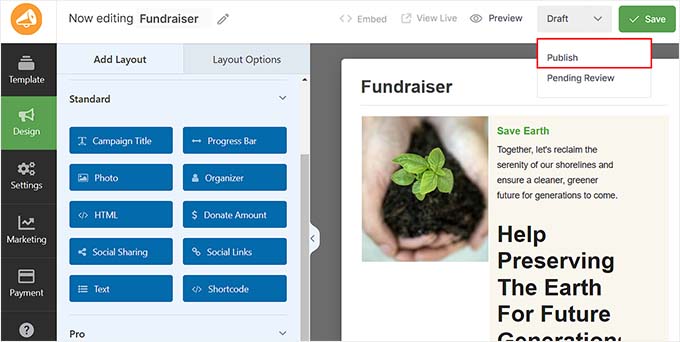
Once you are done, simply change the form status to ‘Publish’ from the dropdown menu in the top right corner of the screen. Then, click the ‘Save’ button at the top to store your settings.
Now, just visit your WordPress site to view the donation form with the fee recovery option.
Bonus: Accept ACH Payments in WordPress
If you do not want to pass payment processing fees to customers in WordPress, then you should consider accepting ACH payments on your website.
ACH is an electronic bank-to-bank payment made through the Automated Clearing House (ACH) network in the United States. Keep in mind that this method will only work if your business is based in the USA.
Accepting ACH payments can lower your transaction fees a lot as Stripe’s fee for ACH is just 0.8% per transaction compared to its usual 2.9%.
For example, if you have a WooCommerce store and a customer buys some products for $100, then the transaction fee with ACH payments will be only $0.80. On the other hand, payment processing fees using other methods will be $3.20.
You can easily start accepting ACH payments on your website using WP Simple Pay.
Simply install and activate the plugin and then visit the WP Simple Pay » Add New page from your WordPress dashboard. Here, you must choose the ‘ACH Direct Debit Form’ template and create a payment form in the builder.
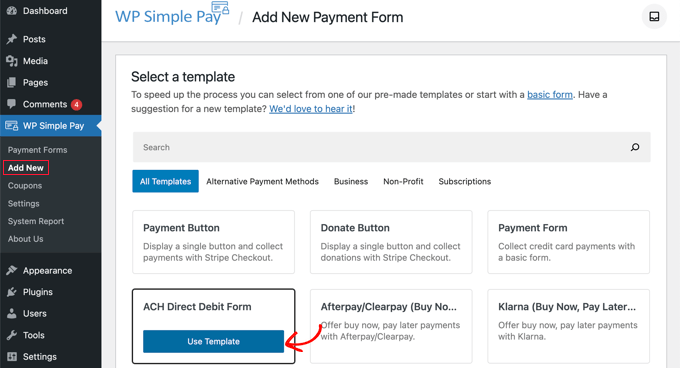
Once you add the form to your website, you will have to pay a lower transaction fee for users choosing this option as a payment gateway.
For more detailed instructions, you can see our tutorial on how to accept ACH payments in WordPress.
We hope this article helped you learn how to easily pass payment processing fees to customers in WordPress. You may also want to see our beginner’s guide on how to easily accept credit card payments on your WordPress site and our top picks for the best WordPress credit card processing plugins.
If you liked this article, then please subscribe to our YouTube Channel for WordPress video tutorials. You can also find us on Twitter and Facebook.
